FAQ - Frequently Asked Questions
Before contacting us we advice you to carefully read our frequently asked questions. We do our best to list the most commonly asked questions here.
NOTE: Blender must be in English for some modules of Cloth Weaver to work correctly!
General | Installation | Updates
Once you have downloaded the Cloth Weaver .zip file, In Blender 2.8 go to Edit → user preferences → Add-ons and “install Add-on from File”. Locate the ClothWeaver.zip folder for your Blender version and choose install… You do NOT need to unzip the .zip folder.
To open the Cloth Weaver tool panel...In Blender's 3D viewport, press 'n' to open Right toolbar
Updating (In Cloth Weaver v4.16+): On Cloth Weaver's top side panel (not in user-preferences), it will allow you to download updates right inside Blender.
Legacy Update: In Blender’s user preferences, REMOVE the old Cloth Weaver version, save user settings and restart Blender. Then install the new update as usual.
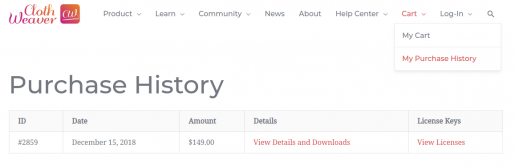
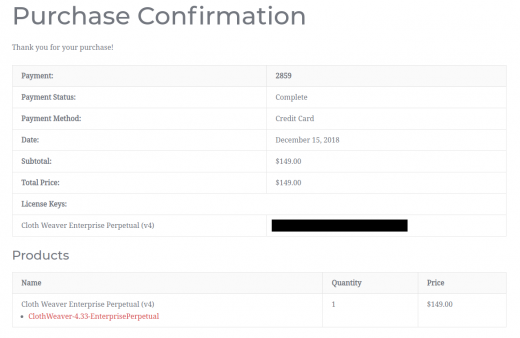
For ClothWeaver.com: Log in to your clothweaver account, select Account/Log-in -> My Purchase History. Here you can download updates, view your receipts and license keys.
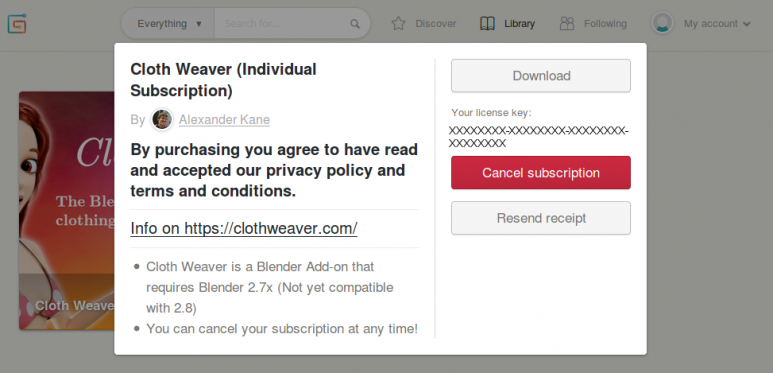
For Gumroad: Log in, select "Library" and choose Cloth Weaver. Here you can download updates, view your receipts, cancel subscriptions and view your license key.
For Blender Market: Log in, select "My Account" -> "Orders". Here you can download updates and view your receipts.
Artstation & Blender Market: To receive or find your license key, please email a copy of your receipt to support@clothweaver.com
Cloth Weaver will work with any OS that supports Blender: Windows, Mac OS X, Linux
*Please see Blender's download page for compatible systems: https://www.blender.org/download/
Cloth Weaver currently works with Blender 2.77-2.79 and will be compatible with Blender 2.8 once a stable version is released.
Error messages
Licenses
Please send a copy of your Blender Market or Artstation receipt to support@clothweaver.com and you will receive a license key.
Please contact us at support@clothweaver.com and we will make it work!
Please contact us using your assigned school email address at support@clothweaver.com
Legal
You own anything you create with Cloth Weaver. Yes, you can use anything you create for personal and commercial use!
*Mini-Market items will tell you if they can be used commercially or not. Please honor them.
**Please obey copyright laws
[Please read our terms and conditions for more information]
Yes! Anything you create with Cloth Weaver is yours to do with as you please. You may NOT re-sell the clothing templates. Sell your models on our market here -> market.clothweaver.com
Working with Clothing | Rigging
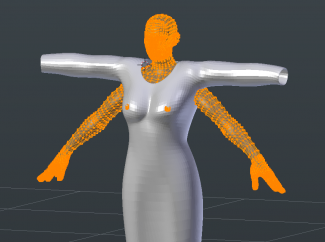
It is best to "pin" some vertices in the cloth sim panel so they won't be affected by gravity. Select your clothing, enter edit mode, in Blender's data panel, create a new vertex group and the area you don't want the sim to influence. For example: Top of a skirt, collar of a shirt, cuffs of a sleeve, etc.
This most likely occurs because a different and high-poly object was selected before pressing 'put on clothing'. It Make sure you have selected the clothing and not the character.
The collision on the character needs to be closer to the skin. On the character’s collision, change the outer to 0.005 or 0.001.
Remember: When attaching clothing, it is a trial and error process. Do not expect it to be exact the first time. Please refer to our tutorials. Try moving the top of the clothing slightly higher above the arms and shoulders. This is the usual area of issue. It will also help to add more ring/loops horizontally in the arm areas. This should close that gap. You could also move the highest shoulder areas closer together. Again, it is a bit of trail and error. You can delete the current model after sewing and restore the backup. This will keep the specific modifiers in-tact. Sometimes, undo-ing may have undesired effects.
If the clothing is too big or small, scale it down or up to match your character. If the character is smaller than one square on the Blender’s default grid floor, then the character’s scale will need to be increased.
~Rigging is offset when switching to edit mode?
Explanation: The above character's default 'resting pose' is in an A-Pose. The character's rig was put into a T-pose and then the clothing was applied to the rig. Because the character has already been posed before the clothing was attached, the clothing will now 'offset' and move the with it. As a general rule, anything applied to a rig will follow the 'resting pose'.
Solution: Select the character, apply the rig modifier. Then select the rig in pose-mode, press space-bar and search for "apply pose as rest pose". Parent character to the rig and then clothing to the rig.
The clothing templates are designed to best work with T-poses. However, if the clothing is adjusted to your specific pose before hand, yes any pose should work. Make sure to read the above post regarding "Rigging Problems" for more info.
Select the clothing in Blender, go to the data panel and make sure the selected UV map is the one you want exported. When unwrapping each section (patterns, bump map, grunge), make sure you have the correct UV map also selected.
View pricing options
View our pricing options, select your best fitand get started with Cloth Weaver!
STAY UP TO DATE
Follow our Discord to stay connected
Join the Community of Artists on our Discord!