Documentation
Please see our documentation to assist your workflow or view our video tutorials to see it in action. (if you have any questions, please see our Frequently Asked Questions.)
Installing
Note: Blender must be in English for some functions of Cloth Weaver to work properly
Download the Cloth Weaver .zip file (Some web browsers may automatically unzip zipped folders.) Keep this file zipped!
*Blender 2.79 is no longer supported
https://clothweaver.com/news/dropping-blender-2-79-support-for-cloth-weaver/
Blender 2.9
- In Blender, go to Edit → user preferences → Add-ons and “install Add-on from File”.
- Locate the ClothWeaver.zip folder and choose install…
- In Blender’s 3D viewport: press ‘n’ to open the Right toolbar. You will see the Cloth Weaver Tab
Updating
In-App Update
On Cloth Weaver’s top status panel, it will alert you when a new update is available. Then you can download the updates right inside Blender!
Manual Update
Manually download the new update from our website or the platform you originally downloaded from. In Blender’s user preferences, REMOVE the old Cloth Weaver version, save user settings and restart Blender. Then install the new update as usual.
(click image to enlarge)

In-App Update via Status Panel
Preparing your character
Video Tutorial: https://www.youtube.com/watch?v=P---dRZbyws
*IMPORTANT: Turn off or reduce any subdivision modifiers/levels on your characters. Highly dense meshes will slow down the simulation. Lower poly characters and clothing work best. Make sure there is nothing else visible in your current 3D view besides your character and the 2D clothing. Move items to different layers when possible.
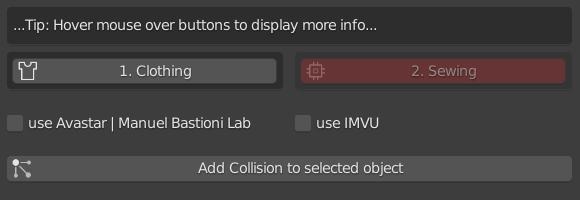
In the Cloth Weaver Sewing Panel, click the checkbox if your current character is a Manuel Bastioni Lab or IMVU character. This will automatically scale the clothing templates to the default character size.
Select your character (make sure you don't select a rig) and click "Add Collision to Character" in the Cloth Weaver panel. View your character's modifiers tab and make sure the 'collision' modifier is moved above any subdivision, but below any rigs/armatures.
Having your character in a T-pose or A-pose works best when creating clothes. This helps reduce cloth overlapping and collision problems.
(click image to enlarge)
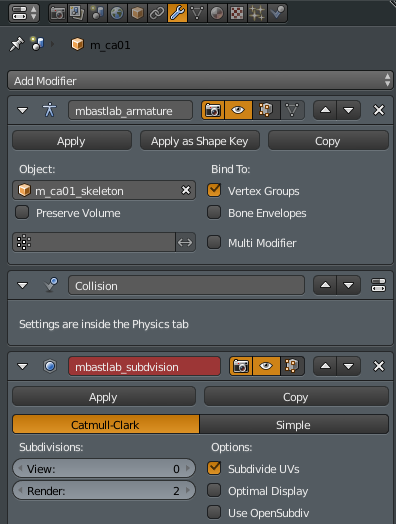
- Subdivision Mod's View is 0
- Collision is between the rig/armature and subdivision modifiers
Physics Settings
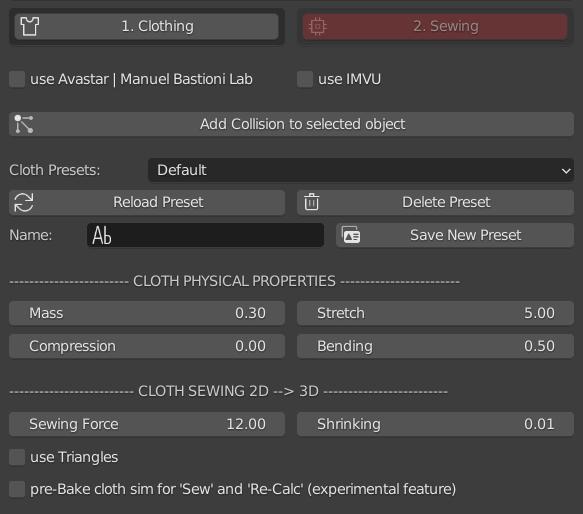
In the Weaver panel (old Design), there are some specific physics parameters. Mass, Stiffness, Bending, Distance, Sew Force, Shrinking, These settings can only be applied to an object when an active simulation is available. An error will occur if you first apply the cloth simulation to your model before you click apply physics settings.
Using the Templates
*Note: this is a trial and error process, it may take some manual adjustments for desired results to be achieved.
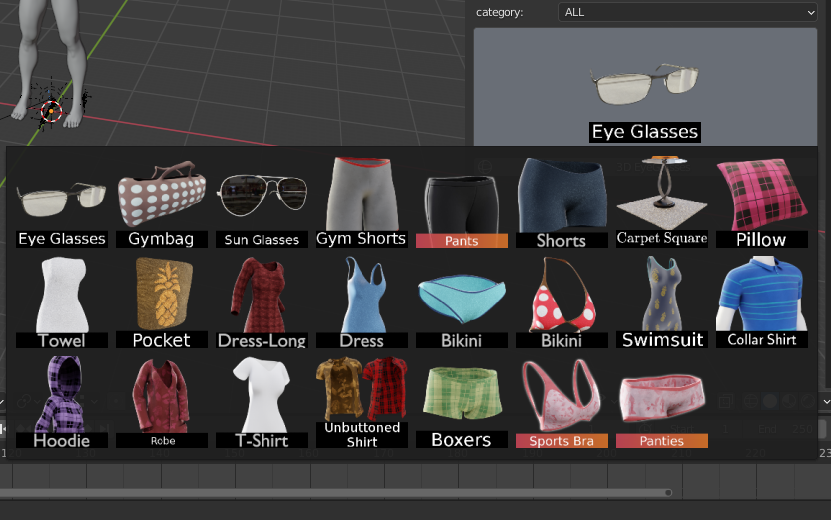
In the templates tab:
- Click on the gallery of images and choose a template you wish to use.
- Choose between a 2D and 3D version. Some templates only have 1 option.
2D: Templates/Outlines to be used for sewing/making clothes for characters.
3D: Pre-Built objects (such as accessories) that can be added to your scene.
Optional, Pre-Built clothing models could be aligned to your character and using the ‘Re-Calc sim’ button to attempt to fit it to your character.

2A: Create a 'guide' and checkmark 'use .. Guide'
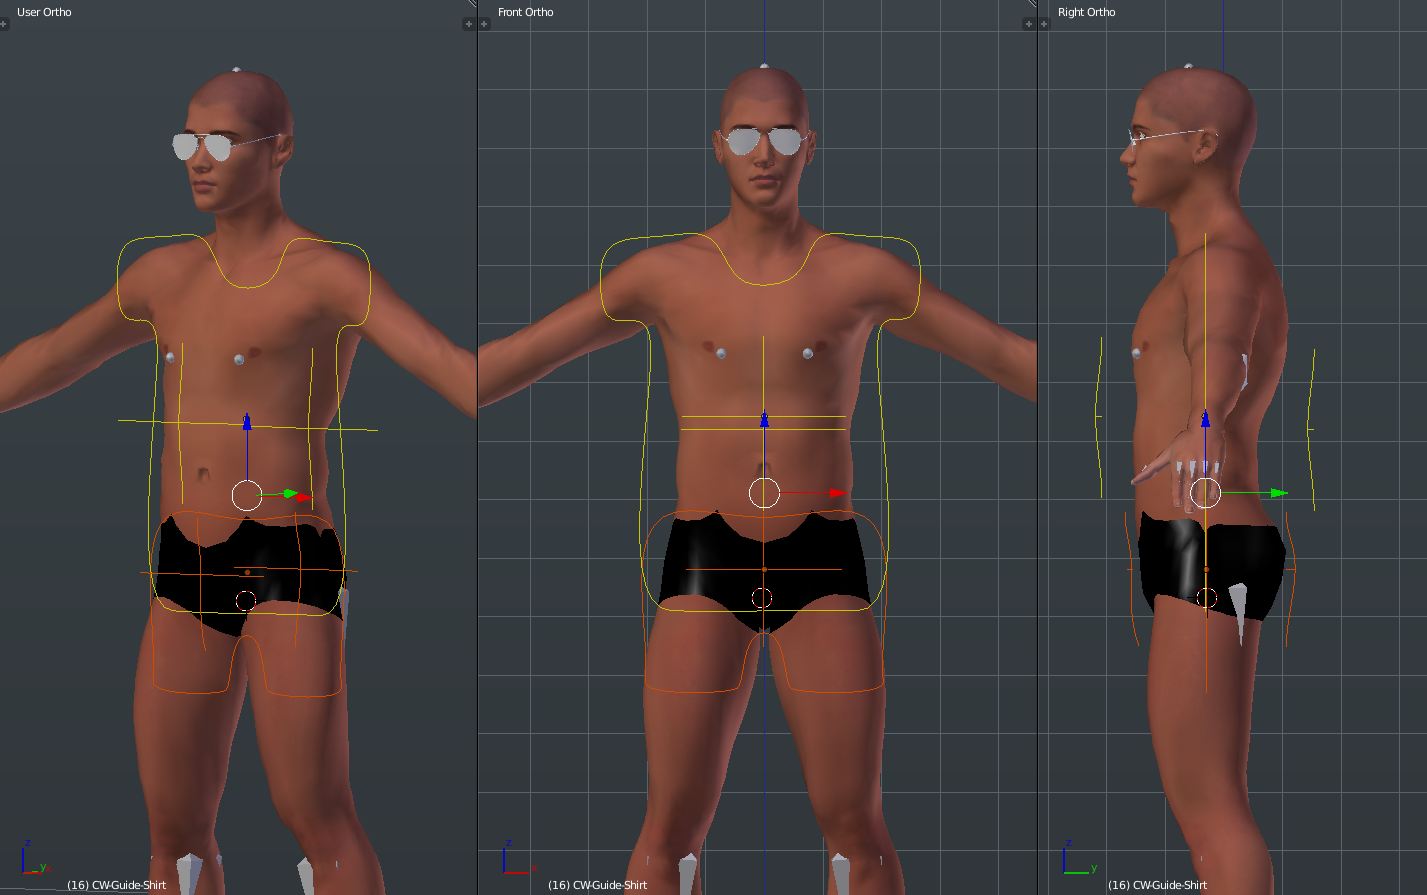
2B: Manually align guides to your character
Clothing Templates
- Create a shirt/pants guide (optional) and align it to your character. Click ‘use ..guide’. This will auto-align templates to your character)
- Click ‘2D..’ and the template will appear in the 3D View.
- Align and scale the template to your character. The faces of the clothing object must not intersect with your character.
- Adjust if necessary: Enter Edit-mode with your clothing selected and further adjust the vertices if necessary. Make sure the clothing extends beyond the character. Do not allow the 2D template to touch or intersect with the character. IE: The sleeves are above the shoulders and extend over the arms. Same with the body. There needs to be enough fabric when the clothing wraps around the entire body.
Custom Clothing
*Note: this is a trial and error process, it may take some manual adjustments for desired results to be achieved.
In the templates tab:
- Create a ‘Base Plane’ and a square will appear in your 3D view.
- Align it to your character’s front side. The object must not intersect with your character.
- Enter edit mode and delete the 1 of the 2 horizontal edges. Now you have 2 vertices, 1 at center position and 1 towards the right side.
- Create an outline: Begin extruding vertices, Select the right side vertice and press ‘E’ to extrude an edge. Continue extruding edges to create a basic outline of your clothing. The Edges must extend beyond the borders of your character’s body.
- Close the outline loop: Select your last vertice and the center vertice then press ‘F’ to connect and complete the loop. All vertices should have 2 edges.
- Fill in the faces: Faces are constructed from 4 vertices. Select 4 vertices and press ‘F’ to fill/create a face. Continue creating faces until the outline is filled. (If you are unfamiliar with this process and proper topology, please see video tutorials for Blender modeling) All faces should have an even number of vertices. 3 or 5 sided will not work properly. (If you want to use triangles for game engines, checkmark use triangles in Cloth Weaver’s Design Panel. This will convert your object to triangles during the ‘sewing’ phase)
7) Create the Backside of the clothing: Use the ‘create backside’ button in Cloth Weaver’s side panel when in Edit-Mode. Adjust this selection of vertices, move it behind your character. If manually creating the backside, you need to ‘flip the normals’ of those backside polygons.
8) Check & Flip Normals: Make sure that the normals are facing the correct direction. Outside should appear 'blue' and insides are 'red'. Search in Blender for 'Recalculate Normals...Outside.."
9) Define the edges to be sewn together: In order to sew your clothing together, you must define the edges that will connect. Begin by selecting 2 parallel edges and click ‘mark parallel edges’.
10) Sew the clothing to your character: Exit Edit-Mode, make sure your character is setup properly and has a collision applied. Select your clothing and click ‘sew clothing’. The clothing will begin to wrap around your character and connect at the defined edges.
11) Apply, Re-Calc, Smooth - Process for adjusting the clothing, no Undo: There are 3 main buttons that you might be alternating between in order to adjust the clothing: Apply, Re-calc, and Smooth. We do not encourage using Undo as this can produce undesired changes in the simulation and is also known to sometimes cause Blender to crash. Here is the process: play the simulation to a desired frame (IE: 25) and click ‘Apply Clothing’. Change any physics settings now before applying the cloth sim. Now enter Edit-Mode and make small adjustments to the cloth model, then exit Edit-Mode. Use ‘Smooth’ to smooth out the clothing if desired. This could make the clothing appear smaller, so scale it up a little. Now use ‘Re-Calc’ to run the simulation again with new changes. Repeat this process until desired.
12) Stitch Clothing (Optional): To remove the seams/gaps in your clothing (sometimes it serves as a style choice) use the ‘stitch’ button
Materials & Textures

Open Blender's Material & UV Editor
- Select your clothing - In the 3D View, select your clothing and enter Edit Mode
- UV Maps - In the Properties Window (far right side); Cloth Weaver templates have 3 UV Map groups: Pattern, Bump and Grunge. Select one to edit that specific UV mapping
- UV Unwrap - In Edit mode, select all vertices and press 'U' to UV unwrap your model. Scale and adjust the size of your texture/pattern
- Textures & Materials - In the material view, there are 2 image slots; 'PATTERN' and 'BUMP'. Use the drop down to see more or import your own textures
Advanced UV Unwrapping
Rigging your clothing
Video Tutorial: https://www.youtube.com/watch?v=n4Jiv5_OuJE
*IMPORTANT: Clothing and Armature/Rig must be visible. Armature needs to be in OBJECT mode.
In the Cloth Weaver Design Panel:
- make sure all clothing, character and armature slots are defined
- click "attack to armature"
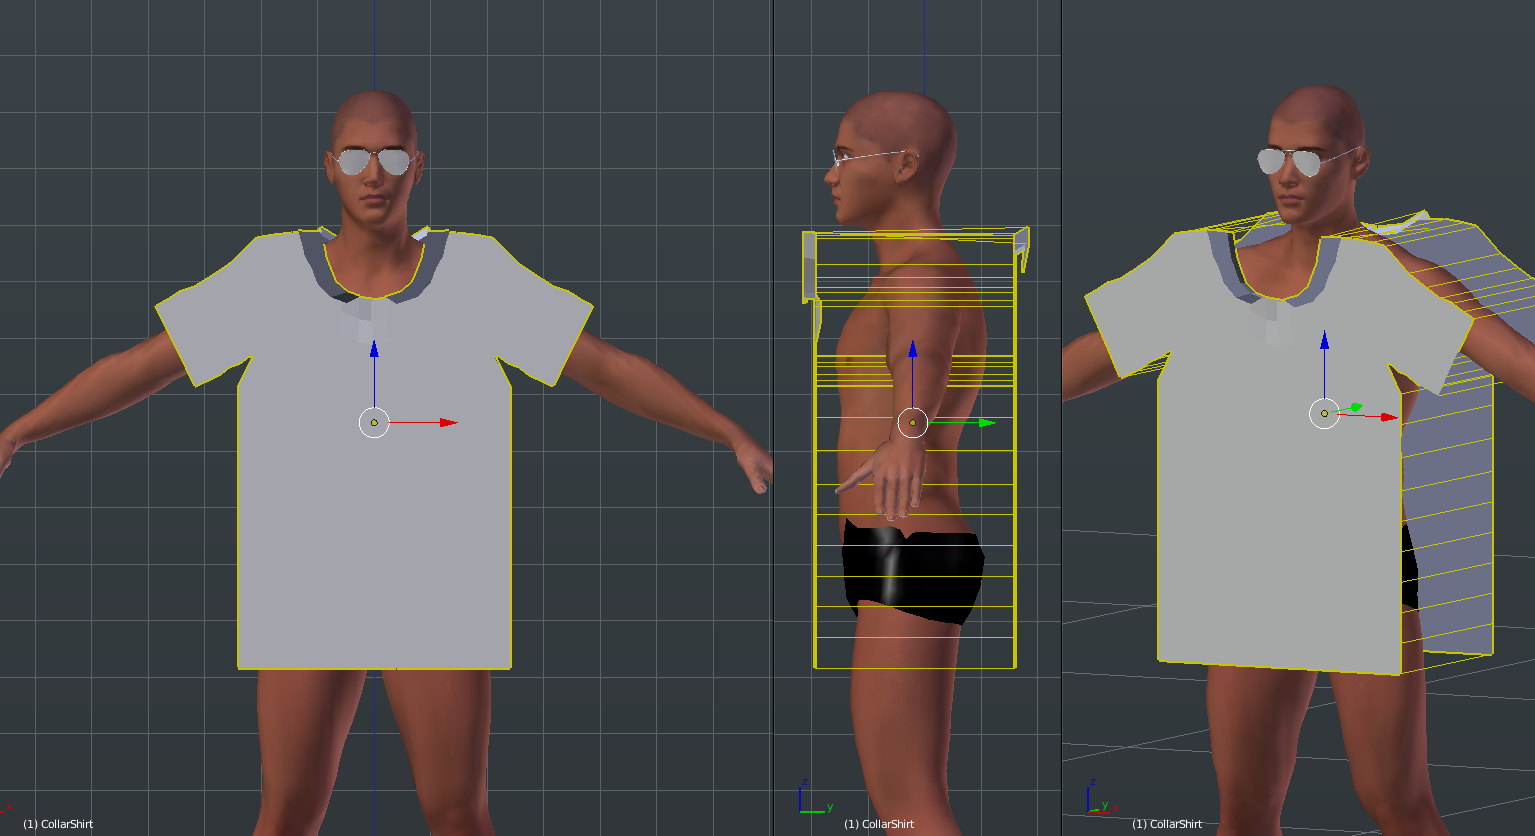
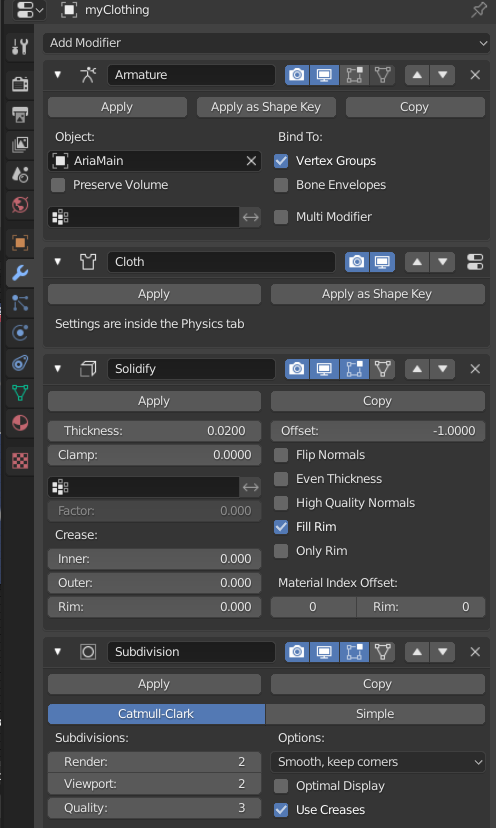
Select the clothing. Make sure the 'armature modifier' is on the top. Then the following if applicable:
- Cloth
- Solidify
- Subdivision
(click image to enlarge)
Saving & Loading Custom Clothes
Video Tutorial: https://www.youtube.com/watch?v=2jFs8EKWVhU
*NOTE: This feature is only available for the Blender 2.8 + version of Cloth Weaver
You must enable 'auto-run python scripts' in Blender’s preferences for save features to work.
*Navigate to the User Templates Tab: 'Templates -> User Templates'
Saving your items:
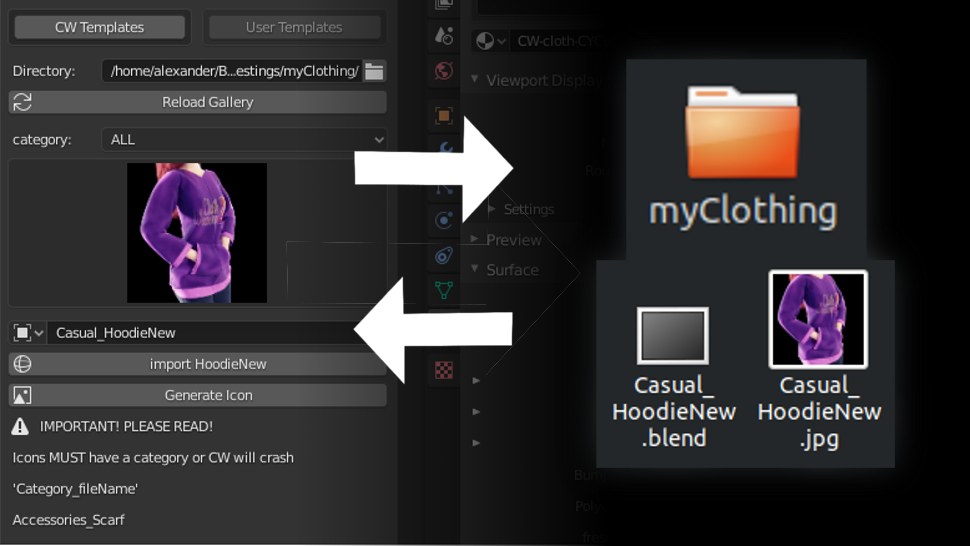
- Define a directory -Browse to your desired location on your system and create a new folder for your custom items (IE: myClothing)
- Select your custom clothing template/model in your scene that you wish to save -NOTE: If the object is a child, the parent will also be imported (IE: Bones)
- Rename the object with a category: "Category_fileName" (IE: Causal_HoodieNew) -NOTE: Skipping this important step will cause Cloth Weaver to crash.
- Align your active camera to your object for the preview image - NOTE: This will render all active/visible objects and lights in the scene
- Click ‘Generate Icon’ to create a thumbnail and export your object to a new .blend folder - NOTE: Thumbnail is a 256x256 jpg and might take time to render depending on the complexity of your scene - NOTE: A new Blender window will quickly appear and disappear on your screen. However, if ‘auto-run python scripts’ is not checked, you will have to manually allow the script to run.
- Click ‘Refresh’ to reload the thumbnails
Export your items to share/sell online via CGWardrobe.com or other platform:
- Package your items into a .zip folder -In our example above "myClothing -> Causal_HoodieNew.blend + Casual_HoodieNew.jpg" Click on the root folder and compress it to a .zip folder. (IE: AuthorName_ProductName.zip)
- Share/Sell your new product -Upload your .zip folder to the CGWardrobe.com or platform of choice
Loading your items:
- Define a directory and click ‘refresh' (unless already defined)
- Click on the gallery and all thumbnails will appear
- Choose an item and then click ‘create’
Import items from other sources:
- Download the item(s) as a .zip folder. Unzip and you will find 2 files (.blend and .jpg).
- Move those 2 items to your custom directory or create a new directory
- In Cloth Weaver, define the directory mentioned in step 2 (unless already defined)
- Click ‘Refresh’ to reload the thumbnails
View pricing options
View our pricing options, select your best fit
and get started with Cloth Weaver!
STAY UP TO DATE
Follow our Discord to stay connected
Join the Community of Artists on our Discord!